peerScholar – Get Started
If you’re new to peerScholar we recommend you check out peerScholar overview, before reading the information below.
Will peerScholar be available in Canvas?
peerScholar is currently available and will remain available during the 2024/25 academic year. Canvas has options available for supporting peer assessment. Therefore, at a future date, a decision will be taken on whether Canvas meets our essential requirements for a Peer evaluation tool and whether there is a need to retain peerScholar. Any changes to the availability of the peerScholar tool will be communicated via the Teaching College newsletter.
peerScholar Pilot
FSE are piloting using peerScholar on a limited basis and can support staff who either:
- Need to use a peer evaluation tool for assessment and don’t have an existing workable process in place.
- Would like to try using the tool and are happy to invest some time in learning a new tool.
In this article you will find information on:
- Discussing your requirements with eLearning.
- How to create a peerScholar link in Blackboard.
- Choosing and creating an activity within peerScholar.
- A basic overview of how build a workflow within peerScholar.
- Links to further resources.
Talk to eLearning
peerScholar is a powerful tool, with varied options. We recommend having a chat with the eLearning team, to discuss your requirements and workflow. We can discuss with you:
- Whether your current rubric will translate well into peerScholar and which types of assessment items you could use to build your rubric.
- How your final grade is calculated. peerScholar has a range of options to help calculate grades and export data should you need to apply specific formula or adjustments to grades outside of peerScholar.
- What your instructor marking process looks like and whether or not you wish to use the instructor marking facility within peerScholar. Note: peerScholar does not facilitate double marking.
Create a peerScholar link
The steps below look at how to create a peerScholar link in your Blackboard course space. If it is the first time you are using peerScholar, you may be provided with some on screen prompts to confirm that you are happy to use peerScholar within your LMS (Blackboard).
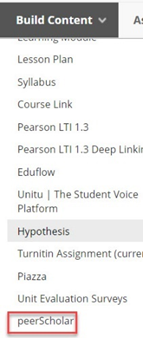
- Open the relevant Blackboard unit and navigate to the area, that you want to create the peerScholar link in. (We recommend setting up the link in your Assessment and Feedback area).
- Choose Build Content>peerScholar.
- Enter a Name for the evaluation and an optional description.
- Optional – add a file attachment.
- Marking section:
- Enable Evaluation set to Yes. (This will trigger Blackboard to create a Gradecentre column for the assessment).
- Next enter possible points.
- Visible to students can be left as No.
- Due date can be left blank. (Students will be able to see the dates for each phase within peerScholar).
- Options section:
- Choose whether to Permit users to view the content. (Yes will allow students to see and open the peerScholar link). Note, that you can control within peerScholar when to show an activity to students and the dates that each phase opens and closes for students.
- Select Date / Time restrictions can be left blank unless you wish to set specific dates that the peerScholar link is available to students in Blackboard.
- Choose Submit to save the settings and create your peerScholar evaluation.
- You should now see your peerScholar link.
What workflow will my students follow?
For an overview of the workflow students follow see the peerScholar Overview article.
Creating an Activity within peerScholar
The first step you’ll need to take in peerScholar is to decide on what type of activity you are building. If you’re not sure what activity type to pick check out the peerScholar Overview article.
Decide on your activity type
- Within peerScholar you will need to choose an activity type
- Classic Individual
- Case study
- Teamwork or group
- If you’ve previously created activities in peerScholar you may see options to Copy Activity, in addition to New activity.
- Choose Create Activity to start building your activity. The set up options that you see will depend on your chosen activity type.
Building your Activity
Below is a summary of key steps involved in building an activity:
- Build your activity where you will include any instructions that students need to follow and set up the rubric (assessments), that students need to complete.
- Manage groups: For a Team & Group Work activity, you can sync existing groups from your course unit or manually create groups in Peer scholar. However, if you are using a Case Study activity, you cannot sync groups and will need to manually or bulk allocate students to each case. To bulk upload students to a Case Study you will need to download a CSV template from within peerScholar, edit the file and then reupload it.
- Set dates: set the dates and times for submission (create phase), peer assessment period (assess phase) and reflection phases, will be open to your students.
- Customize Grading. Set up the rubric for instructors to mark student work. You can also define which assessment activities contribute to a students overall grade.
In the Build Activity Phase you’ll be presented with on screen prompts, click each section to expand it and build the set up you require.
You will see a number of default assessment (rubric items) prebuilt in the Assess and Reflect stages. You’ll need to delete these default items if they are not required, to prevent them showing in your rubric. To do that click on the … icon next to the item and choose delete.
Create Phase
Students will use the Create Phase to submit their work. Add any instructions or attachments that you would like students to see pre-submission within peerScholar.
Assess Phase
The Assess phase is where students give feedback to their peers. In this section you will
- Determine which peers students will review.
- Build your rubric (assessments) that you want students to use to assess their peers.
- Decide whether or not you would like students to self assess their own work.
Build the peer assessment (rubric)
You can use 8 types of assessments to build rubrics in peerScholar. peerScholar will show you a preview of how each assessment will look in ‘student view’ as you build each assessment. We recommend you having a chat with the eLearning team before building your rubric
- Use the + Add Peer Assessment button to add new a assessment.
- You may also see an option to Import Criteria
Self assessment
Self assessment is optional and can be turned off. If you require students to self assess, you can choose to:
- Use the same rubric that students used for assessing their peers. (To do that select the checkbox ‘use peer assessments’).
Or
- Build a new rubric for students to use for self assessment. (To do that use the + Add Self Assessment).
Reflect Phase
Once students have submitted their work and completed any peer assessments (assess phase), they will progress to the reflect phase.
- In the reflect phase students see the feedback from their peers, and can reflect on this feedback in a number of ways:
- Optional: You can require students to respond to / assess their peers feedback.
- Optional: You can require students to revise and resubmit their work after viewing peer feedback.
Group Member Assessments
An optional setting for teamwork/group activities is group member assessments. Group member assessments require group members to assess each others’ contributions. For example, did all team members contribute equally to the task etc.
You can choose at what stage during the process students complete this task. Eg. at Create Phase (after submission), during the Assess phase at the same time they are assessing peers, or during the Reflect phase. Once students have completed the appropriate phase an additional option Group Member Assessments will appear in their peerScholar dashboard.
- If you do not require group members to assess each other’s contributions, then use the slide bar to switch this option off.
If enabling group member assessment contributions then select the settings you wish to use.
Further resources
Below are some links to peerScholar step-by-step guides and videos that you may find useful:
